I know that some of the visitors to this site are representatives or friends of men locked up in Texas prisons. This little post is strictly for the guys in white, and if you think that your friends might find this useful, I hope you will re-transmit this to them. These methods have saved me hundreds of dollars over the last three years, and I think many will find them useful, also.
Once upon a time, I wrote all of my pen-pals by hand. Yeah, I remember that week. It took only a few days of hand-cramps to decide that if the gods wanted us to write by hand, they never would have let us invent typewriters. The problem with constantly using the machine is, of course, the cost. Ribbons seem to disappear at an alarming rate, right in the exact middle of a piece of correspondence. Well, I put my noggin to solving the problem, and I think I have come up with two very simple means to save you guys a ton of money when it comes to your letter writing.
Method 1: How to get multiple runs out of the Olympic/Cleartech ribbon
The cheapest ribbon currently available on the commissary list really isn’t all that cheap when you get right down to it. It is a one-shot ribbon, and at current prices, it will run you two dollars. That said, with very little time and effort, you can actually get two or even three runs out of these ribbons, which begins to make the price seem quite a bit more palatable.
Here’s how it’s done.
Step 1 – To being with, all you need is a piece of paper and some contraband tape. This process requires that the ribbon in question is brand new at this point, right out of the box. Take the cartridge and set it on your table. It should look something like Figure A, seen here
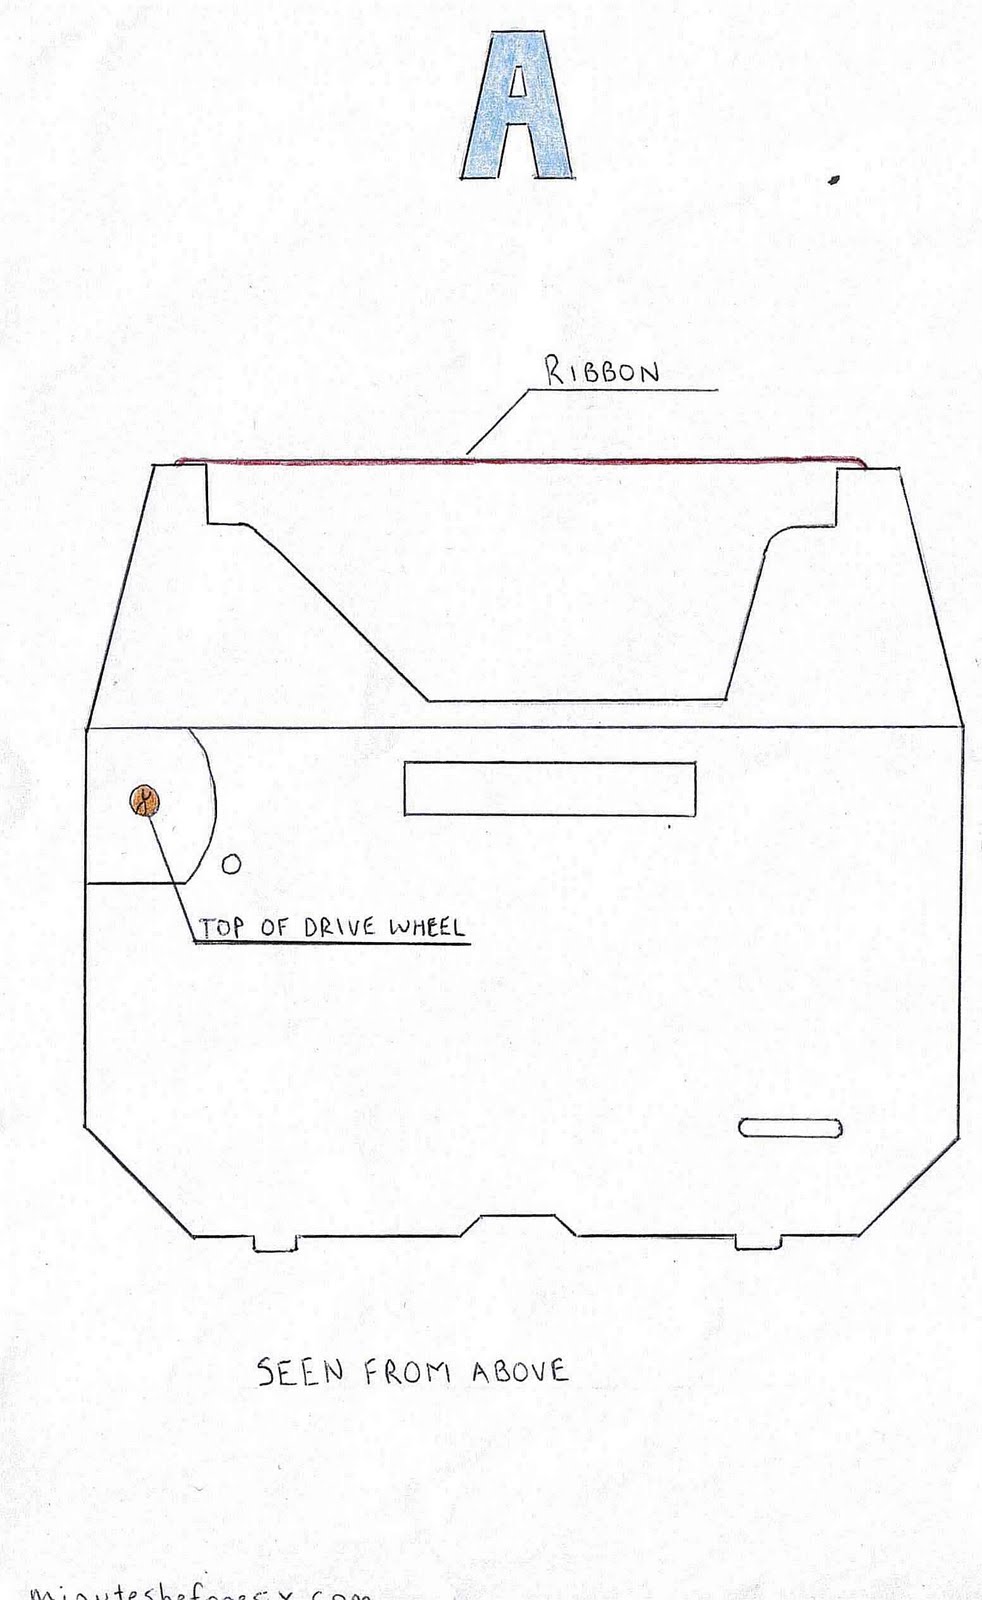
In this image (and in all of those that follow), the ribbon is indicated by the red line. I have labeled a few of the important components, so you can understand the mechanics of how your typewriter works, though we wont really get into the fine details at this point. For now, you simple need to flip the cartridge over and apply a torn sheet of paper with tape, as in Figure B, seen here
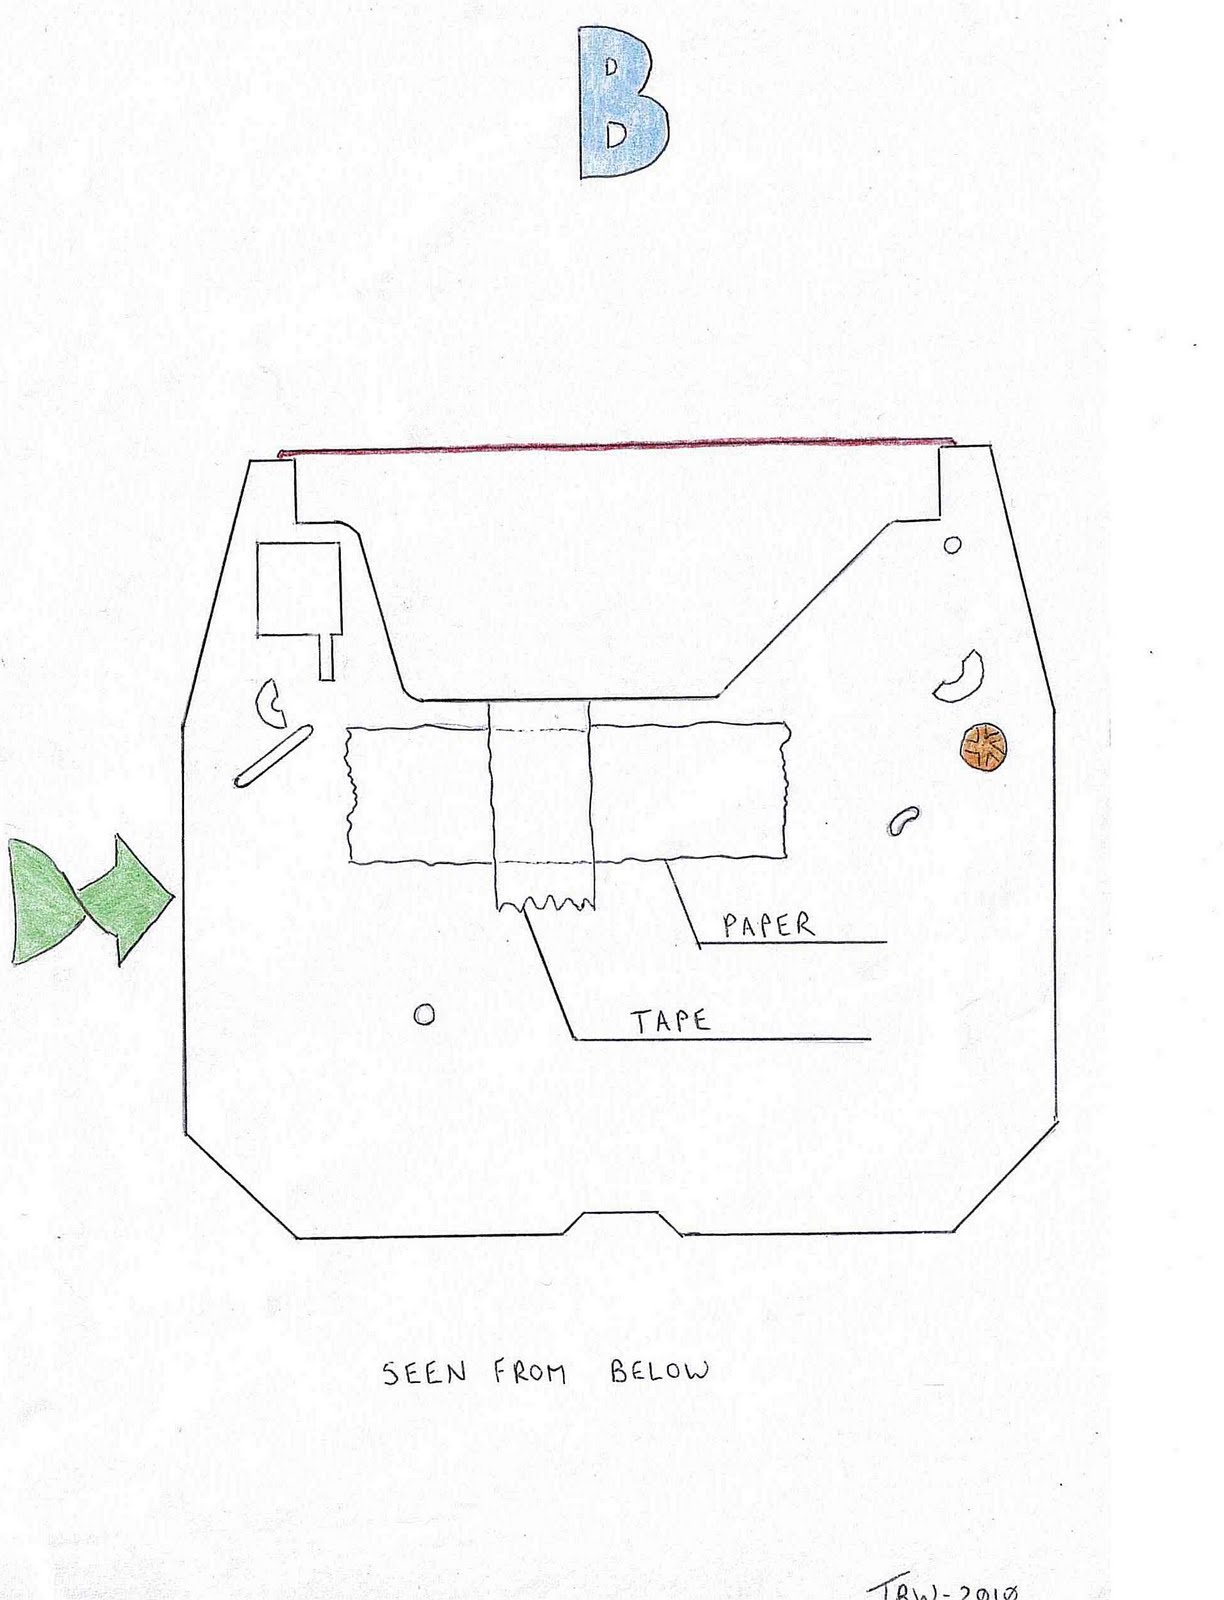
It is important that this piece of paper not overlap the bottom of the orange drive wheel else this will block the connection between the cartridge and the motor on the typewriter. I have found that the commissary order slip forms (SO-7) have the right width. Just tear one in half vertically, and fold it over several times until it is about an inch in width. The basic idea here is simple: unaltered, your typewriter is set up to have the hammer come down in the exact middle of the ribbon. Why? Easy: to sell more cartridges. Now, each ribbon has a width of about 6mm. Each letter, however, only has a vertical length of 3mm. See where I am going with this? Unaltered, you are wasting a ton of surface area of the ribbon, both on top of and below the letters. You paid for that ink, convict; you deserve to use it. So, by placing the paper on the underside of the cartridge, you are elevating the ribbon in relation to where the hammer strikes the ribbon. Instead of typing in the exact middle of the ribbon, you are now typing on the bottom half of the ribbons surface. You may have to adjust the number of folds in the paper buffer a little in order to get it just right, but if you play with it you will have success. Just type away as you would any other ribbon, until you reach the end.
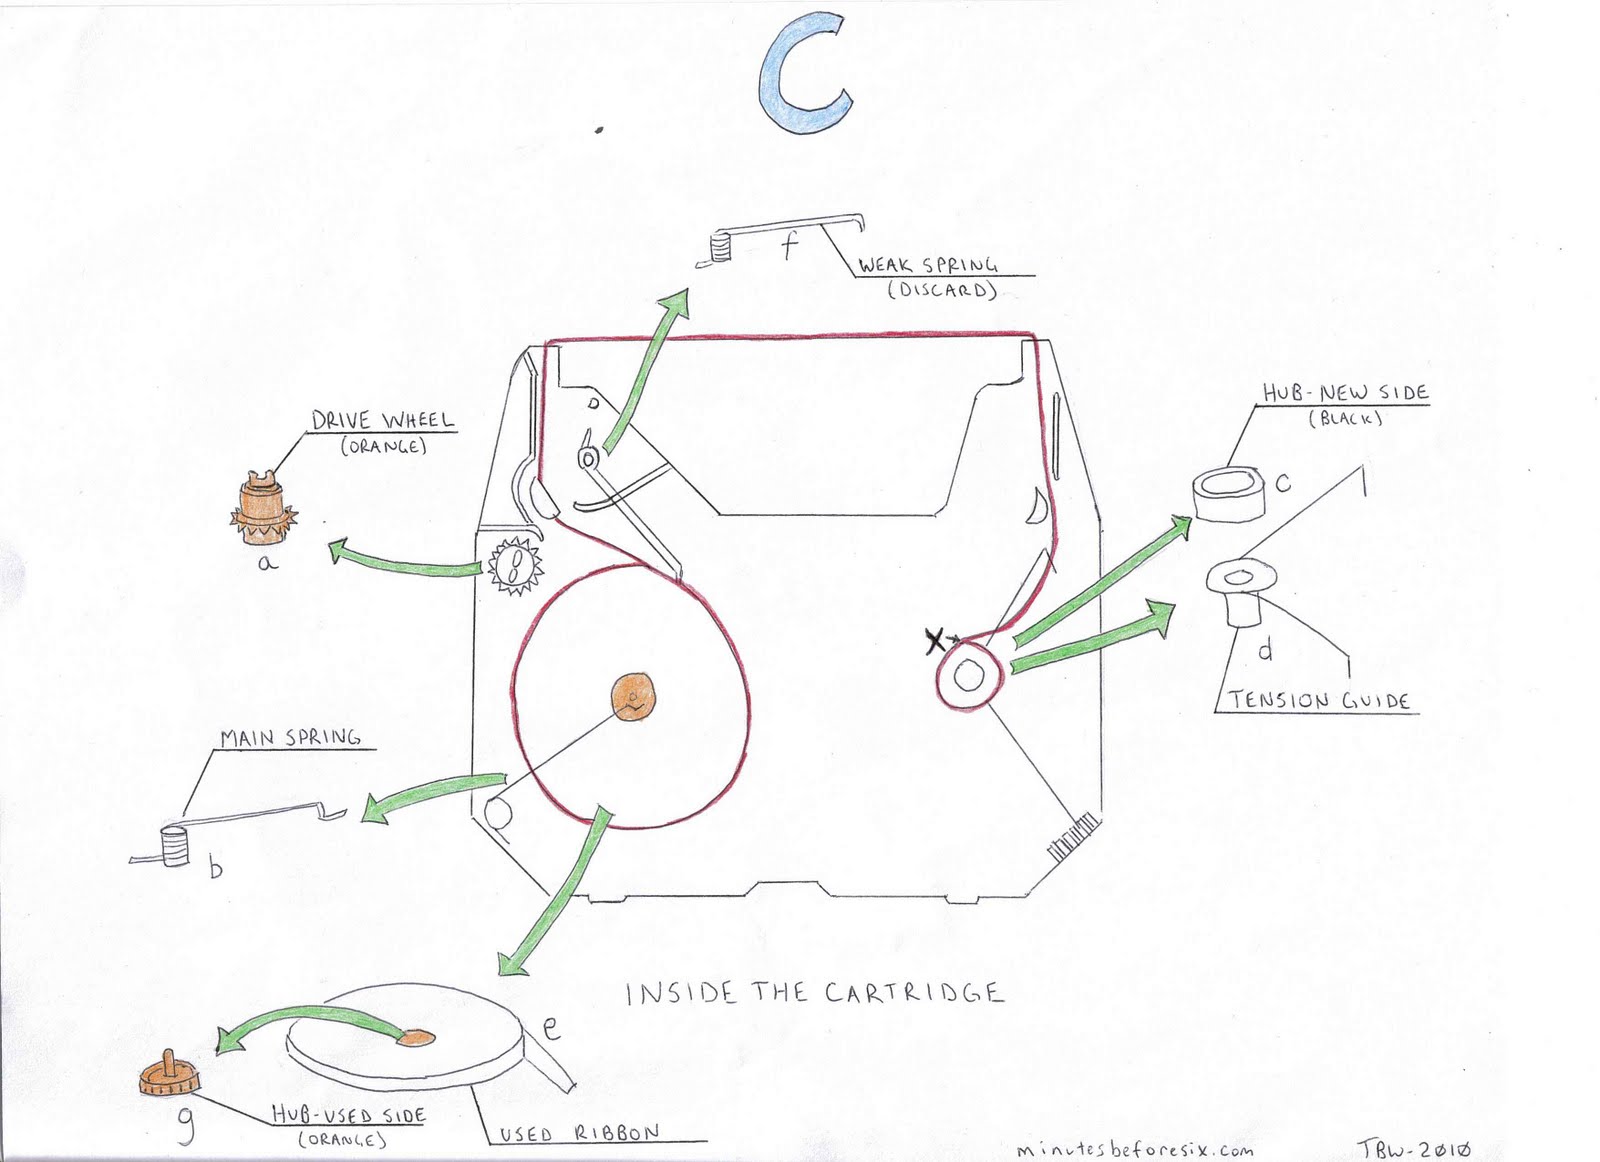
Step 2 – The next step is a little more complicated, but not by much. At this point, you would normally be required to throw the used ribbon away and spend another two bucks to get a new one. Screw that. Take the cartridge out of your machine and set it on your table. You are now going to remove the top lid of the cartridge, with the intention of flipping the ribbon. Once you remove the lid, (which can be a little frustrating but try not to break any of the little plastic prongs), you will see the inner workings of the cartridge, which I have illustrated here in Figure C:
Take a moment to inspect the various pieces:
(a) the orange drive wheel – this is the piece that connects the motor of the typewriter to the cartridge. As it turns, the ribbon moves from the right side of the cartridge, across the gap to be struck by the hammer, and then back into the cartridge on the left side.
(b) the main tension spring – this presses the used side of the ribbon spool firmly against the drive wheel, thus moving the entire system along.
(c) new-side hub – this black piece simply holds the new side of the ribbon spool.
(d) tension guide – this piece sits on top of (and inside) the new-side hub, guiding and securing the ribbon.
(e) the ribbon spool itself – At this point it should be on the left side of the cartridge, having been used once already.
(f) weak spring – this simply guides the new ribbon, but it essentially useless from here on out, so you can discard this. Be sure to flush it down the toilet, as I have seen officers freak out and write a contraband case over possession of this item, thinking that it looks sort of like a hand-cuff key. I know, I know: petty, unjust, capriciously malevolent morons. Get over it.
(g) used-side hub – this orange piece acts as the hub for the ribbon as it gets used.
The basic idea here is to swap the ribbon from the used-side hub (orange) back onto the new-side hub (black). To do this, disconnect the very end of the ribbon still on the right side of the cartridge (point X). It is stuck by tape to the new-side hub, so this is easy to accomplish. Set the new-side hub to one side. Roll the remaining 6-8 inches of the ribbon on to the rest of the spool, and use the sticky end to attach this to itself, so you have a complete spool in your hand, totally wound without the end dangling off to annoy you.
Step 3 – Now we come to the actual flipping of the ribbon, and the swapping of the hubs. See Figure D for a diagram of the process here:
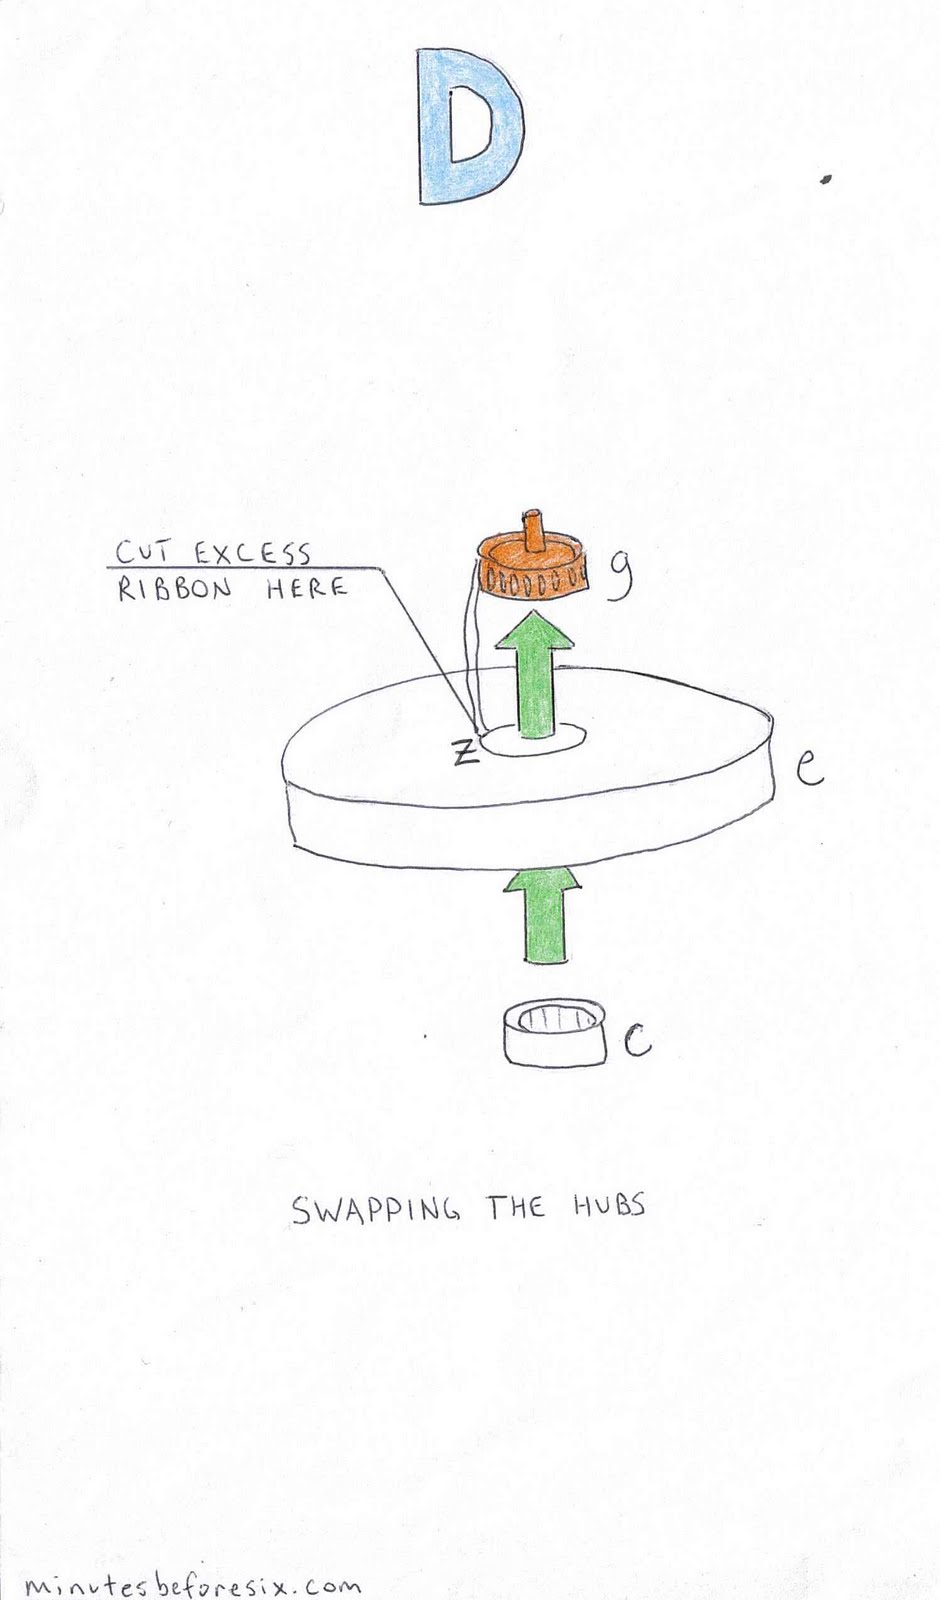
Very carefully, you are going to push the orange used-side hub upwards out of the spool. Keep in mind, the inner terminus of the ribbon is attached to this piece, so it is going to come trailing out as you push the hub out. Ignore this for now. Very carefully, replace the orange hub with the black one. Since the ribbon has been wound under tension, it may begin to warp at odd angles once the orange hub is removed. Don’t force the black hub in; just nudge it in smoothly. Once you have done this, set the ribbon back into the cartridge on the right, with the direction of the outer edge of the ribbon going clockwise.
Now, focus on the trailing edge of the ribbon still connected to the orange used-side hub. Cut this off with a razor blade, right as it comes out of the black hub, which I have labeled as point Z. Take the orange hub and tear off this piece of excess ribbon, and throw it away.
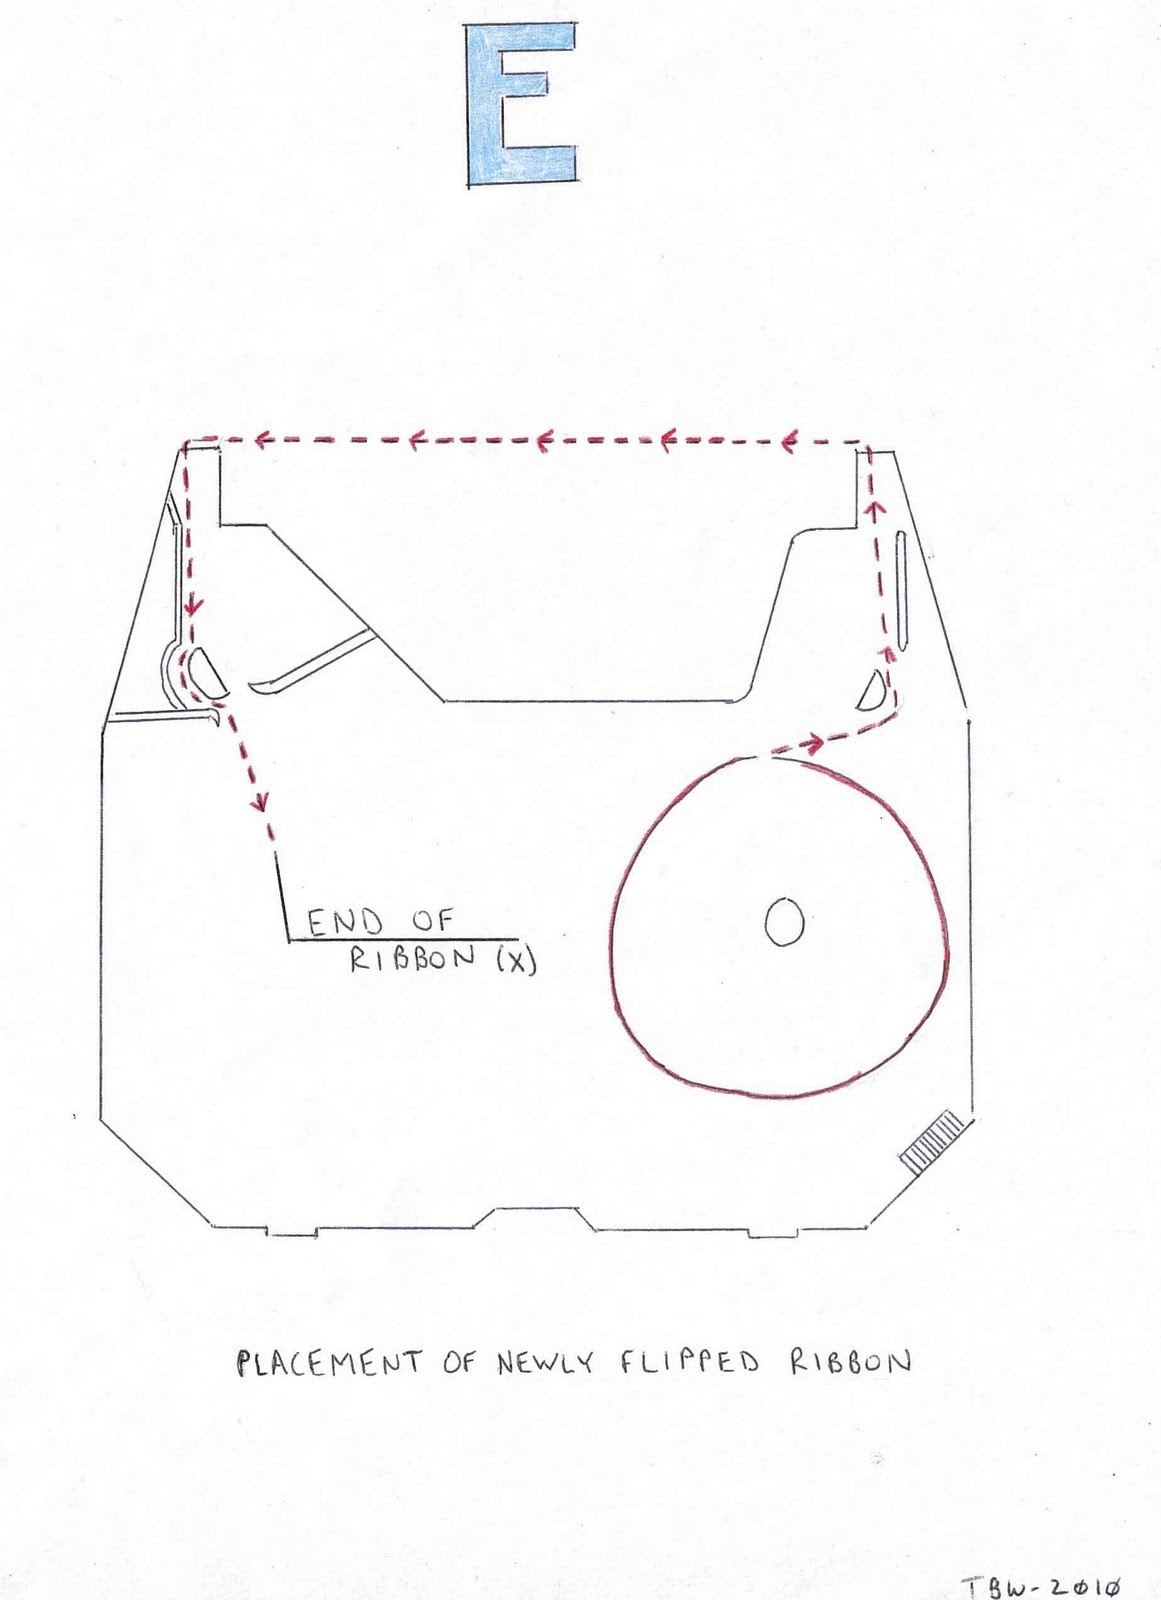
Step 4 – Now that you have done the most difficult part, all that remains is to rebuild the cartridge. First, wind the ribbon back towards the left side of the cartridge, following the path laid out here in Figure E
Once you have moved the end of the ribbon to the location indicated, you will need to re-attach this to the orange used-side hub. This is easily accomplished with a small piece of tape, as illustrated here in Figure F
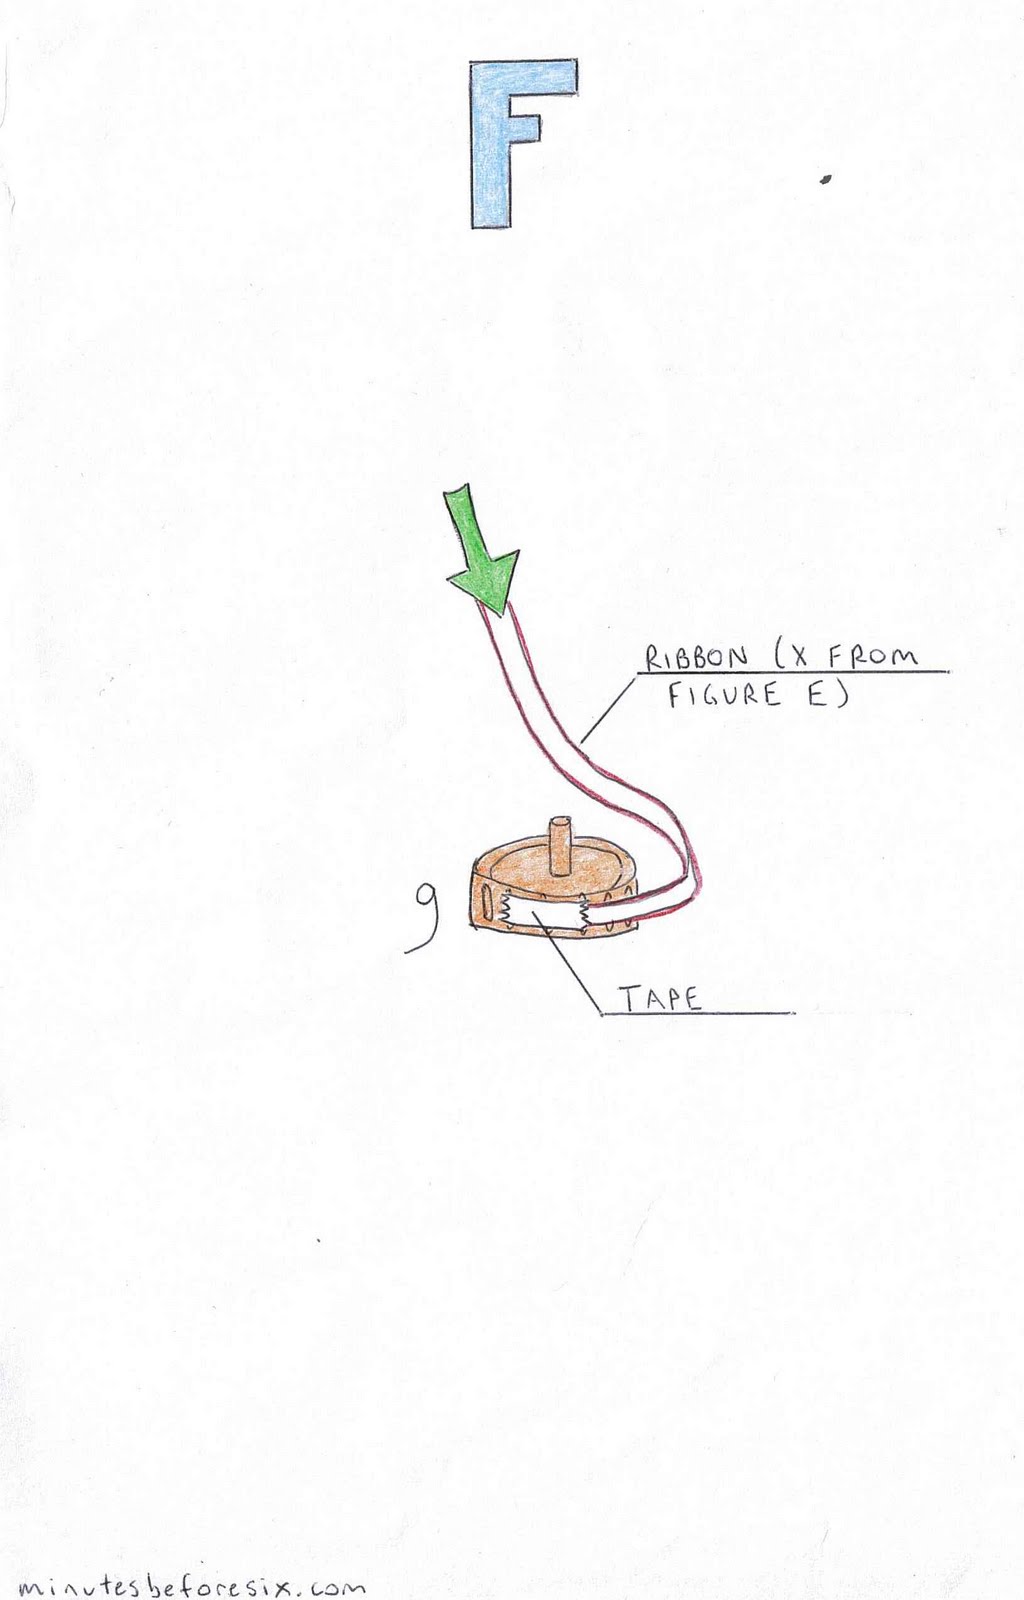
You are now simply mimicking the state of the cartridge as it came from the manufacturer.
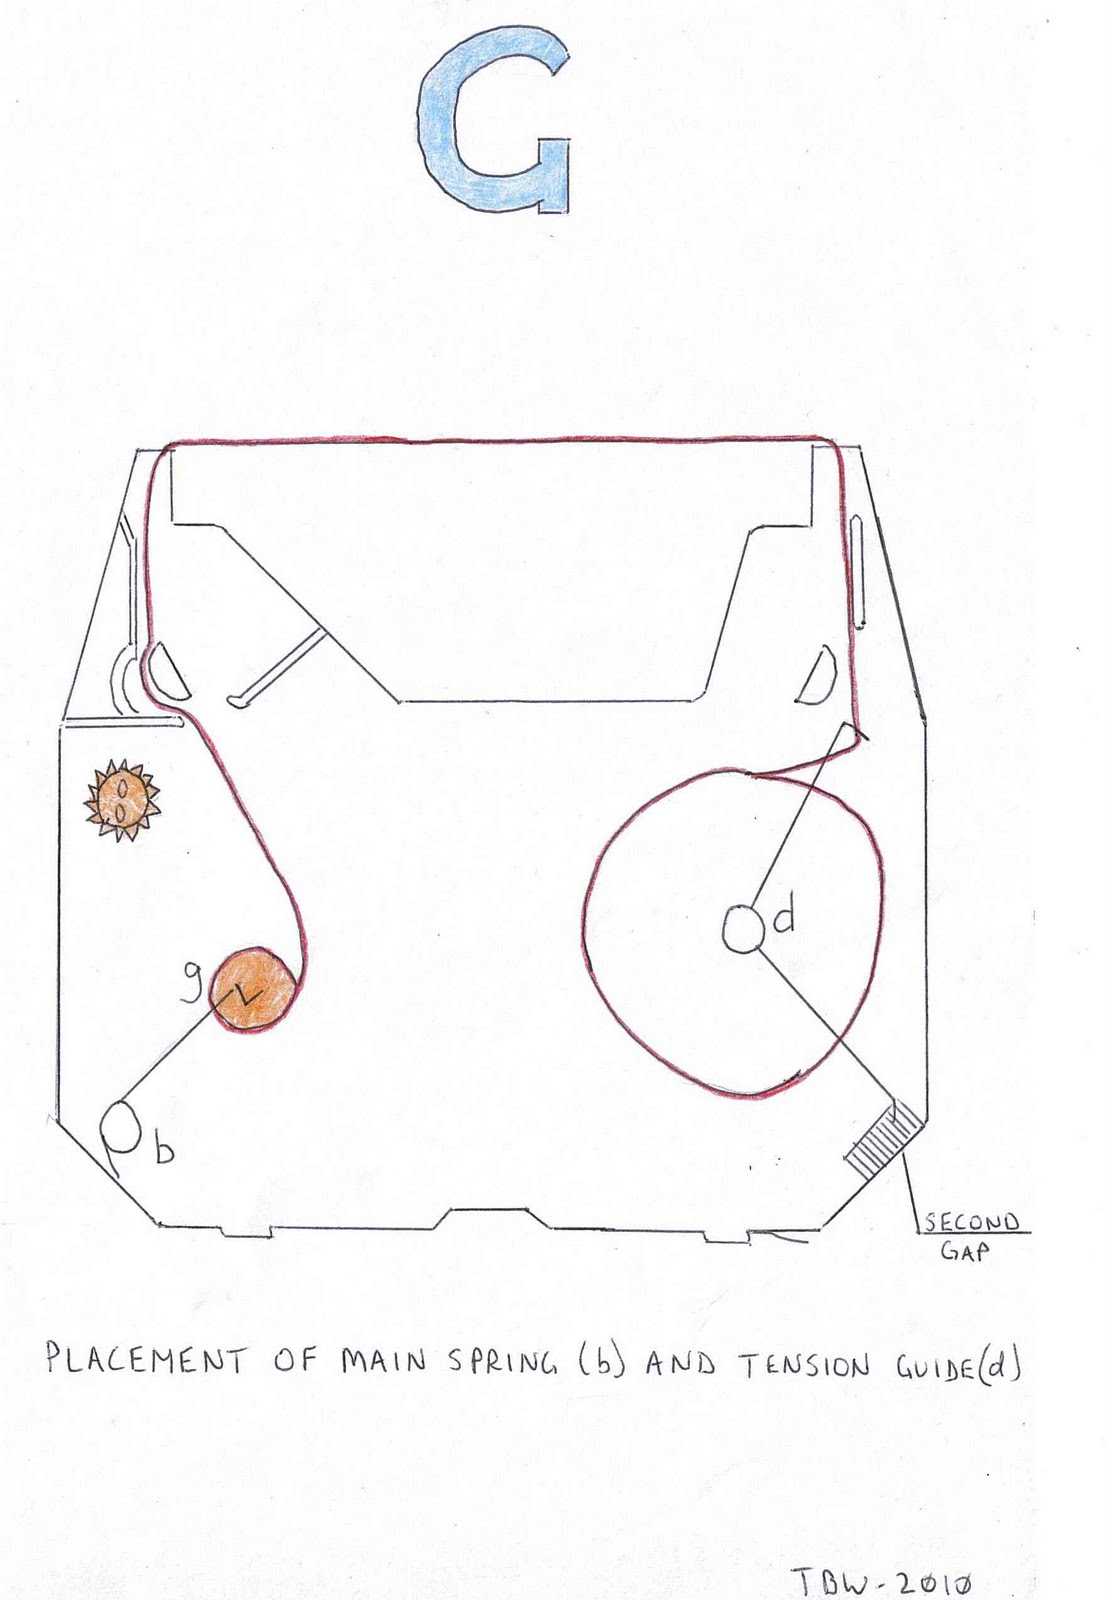
Next, place the tension guide (d) back on top of the new-side hub. The tension guide has two wire prongs which jut out, one on the top and the other on the bottom. The northern prong should fit just to the left of the ribbon, which puts tension on the new side of the spool, and holds it in place. The southern prong fits into the second of six plastic teeth or gaps on the southern side of the cartridge. Any of the teeth will do, for the most part, but I have found that the second gives the best amount of tension. See Figure G here for an illustration.
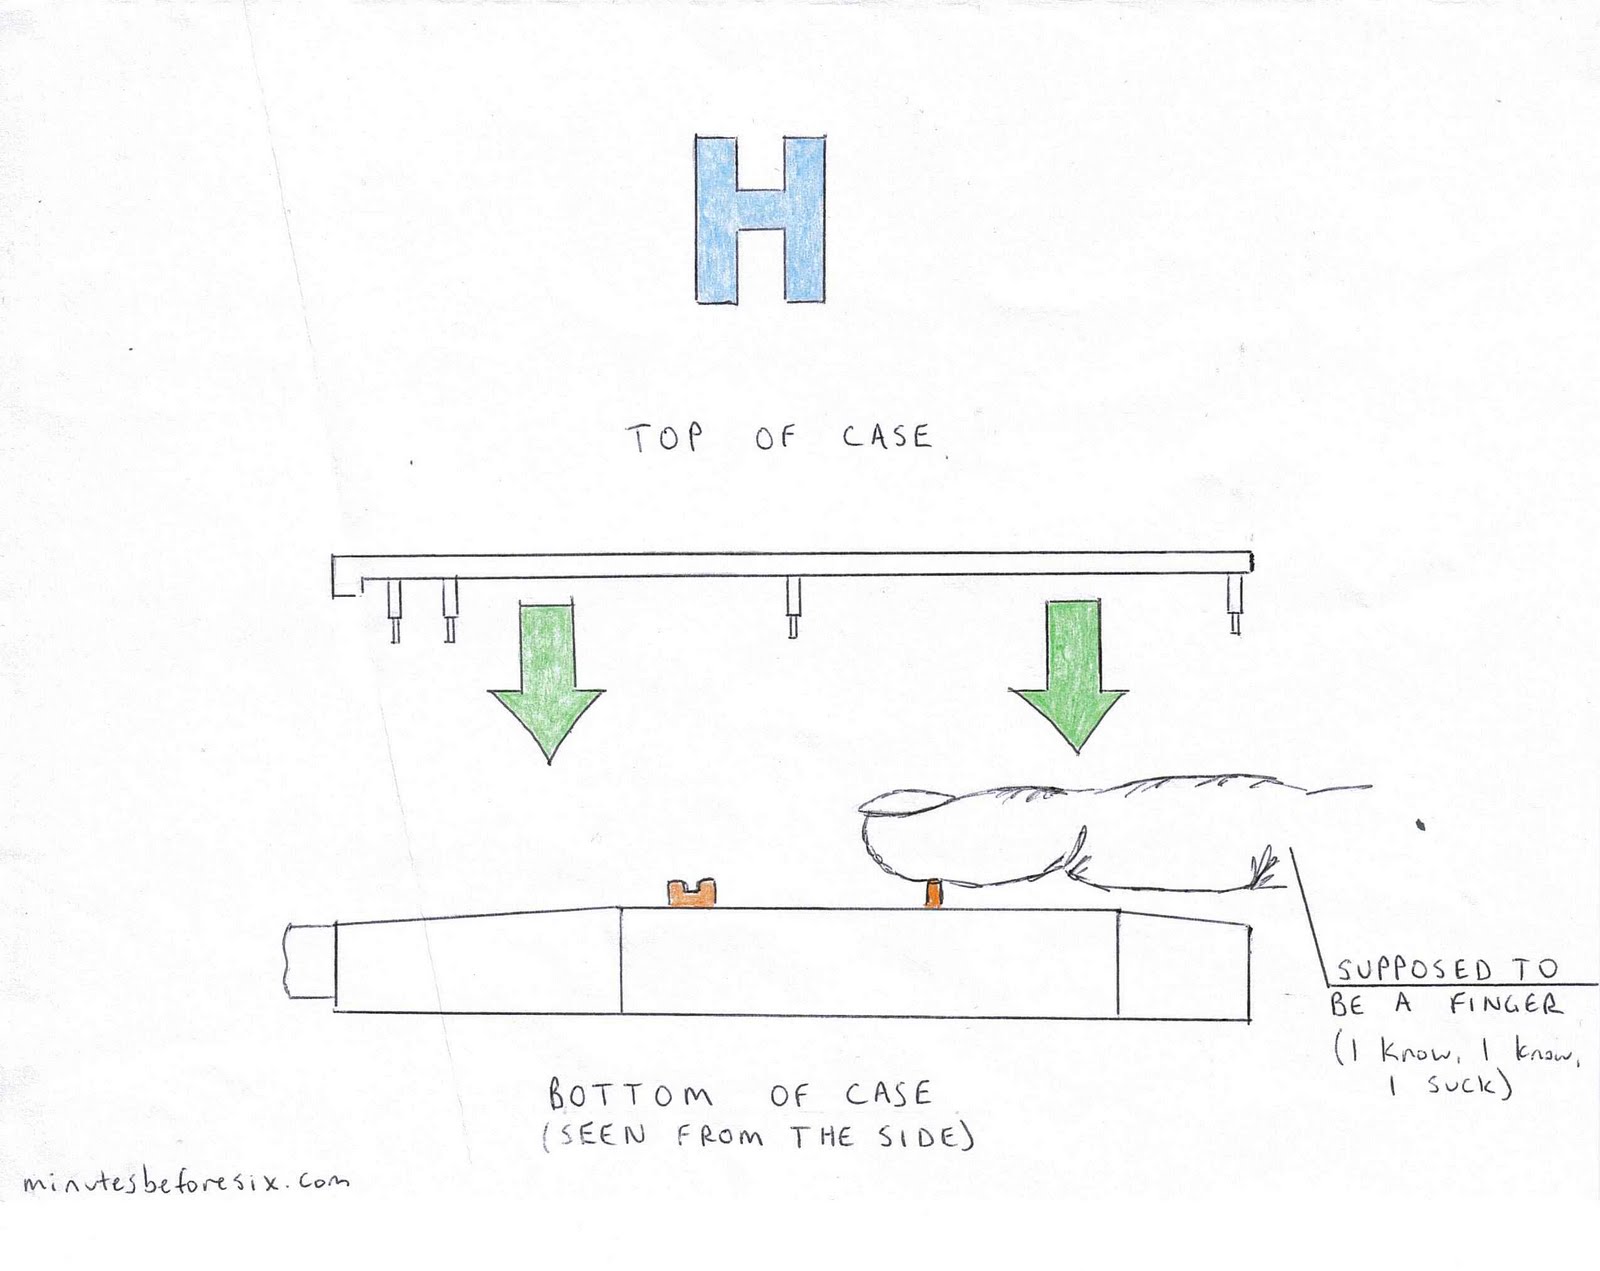
Now, place the orange drive wheel back into its slot. It will want to move around, so hold the cartridge carefully. Finally, the main spring goes back into its slot, which is a black nub on the southwest corner of the cartridge. The other end sits perfectly inside the concave center of the orange used-side hub. It will want to push this hub immediately to the north, up against the drive wheel. This is what it is supposed to do, but until you replace the top of the case, the drive wheel is unsecured, and will go shooting off across the room if you are not careful. Simply put your finger down on to the top of the spring/used-side hub as you lower the case, as seen here in Figure H
 Fit the portion of the case directly over the drive wheel first, securing it. The simply remove your finger and cram down the rest of the case onto the appropriate prongs. Whala! Brand new ribbon.
Leave the paper attached to the bottom of the cartridge, as you will need it to make use of the bottom side of the ribbon. You will see the top side of the ribbon has upside down letters types onto it; these are the results of the first pass of the ribbon.
If one is particularly broke, one can actually get three passes on the same ribbon, but you are going to lose the bottoms of your descending letters. I doubt my pen-pals have seen the bottoms of any y’s or p’s in two years. They are used to it by now, I am sure. To do this, simply increase the thickness of the paper buffer on the underside of the cartridge (Figure B). This will further elevate the cartridge, so that the bottoms of your g’s and q’s (etc) will be cut off, not even striking the ribbon when pressed by the hammer. Do this on both runs, and you will have about a 2mm space in the direct center of the ribbon which is unused. Take the paper off the bottom of the cartridge for this final run. You wont get the best quality of print, as both the tops and bottoms of your letters are going to be vague. I find these are useful for rough drafts of motions or for writing kites, where appearance is less important than simply getting the item done. Using this method increases your buying power significantly; you will be amazed at how far one ribbon can take you.
Method 2: Refurbishing a multi-strike ribbon
For inmates with a little more up-front capital, there is another way to increase the efficiency of your typewriter. This method requires for you to go out and find an old-timer who still has possession of a multi-strike ribbon. They don’t sell these anymore, but if you look, you will find people who have been hanging on to them for years. Even if the ribbon is “used up and worthless,” grab it. Depending on the make and model, these ribbons may be good for 50 to 100 flips. Now, the typewriters which these ribbons were made for haven’t been sold in TDC for nearly a decade, so you are going to have to do some serious mod work to get it to fit in the new Olympia/Cleartech cartridges. If you ask around, someone will know how to build you a new drive wheel and spring. This is the hustle of several guys on each unit, so I wont go into how to do this here, but if you look, someone will step up to school you on this.
Conventional wisdom dictates that once the ribbon begins to fade, it is done for. Not so. Simply take the ribbon and set it on a piece of plastic, like a ramen soup packet, or the top from a vitamin bottle. Take your finger, and dab the tip into the bottle of baby oil they sell on commissary. (Note: only the REAL oil will work here, ie, the brand new stuff or the oil they sold 8 or 9 years ago, NOT the imitation crap sold in the interim.) Apply this oil in small amounts to the top of the ribbon, and then let it sit for 24 hours Them flip the ribbon over and do the same to the bottom. This will cause the ink to dissolve and flow with gravity into the middle of the ribbon. It will be nearly as dark as it was the day it was new, and will give you another 50 or 60 runs. The major gripe with these multi-strikes is that are they are not correctable. True, true, but for rough drafts they cant be beat. I bought ten of these once, and am still using the FIRST one, six months later. I’ve flipped it maybe 400 times.
Anyways, I hope that this helps some of you.
W/R
Thomas
© Copyright 2010 by Thomas Bartlett Whitaker. All rights reserved.


No Comments
Estelle
June 15, 2012 at 9:46 amOh my,….I know I shouldn't laugh, but I can't help it… I came over this by accident and indeed I have a friend on the row….I'm wondering if he knows how this works and if I can send him this via regular mail….?!?
Thanks, Thomas!